
How to use the workload calendar
Written by Nutcache Team
Updated
Overview
The Workload Management Calendar gives you a clear view of your team’s capacity and planned work over time. Use it to plan projects at the phase or task level, distribute hours among team members, adjust schedules, and quickly identify workload or budget issues.
By combining high-level phase planning with detailed task scheduling, Workload lets you begin planning before every task has been created and gradually add more detail as the project progresses.
Phase-based workload planning is available with the Enterprise plan.
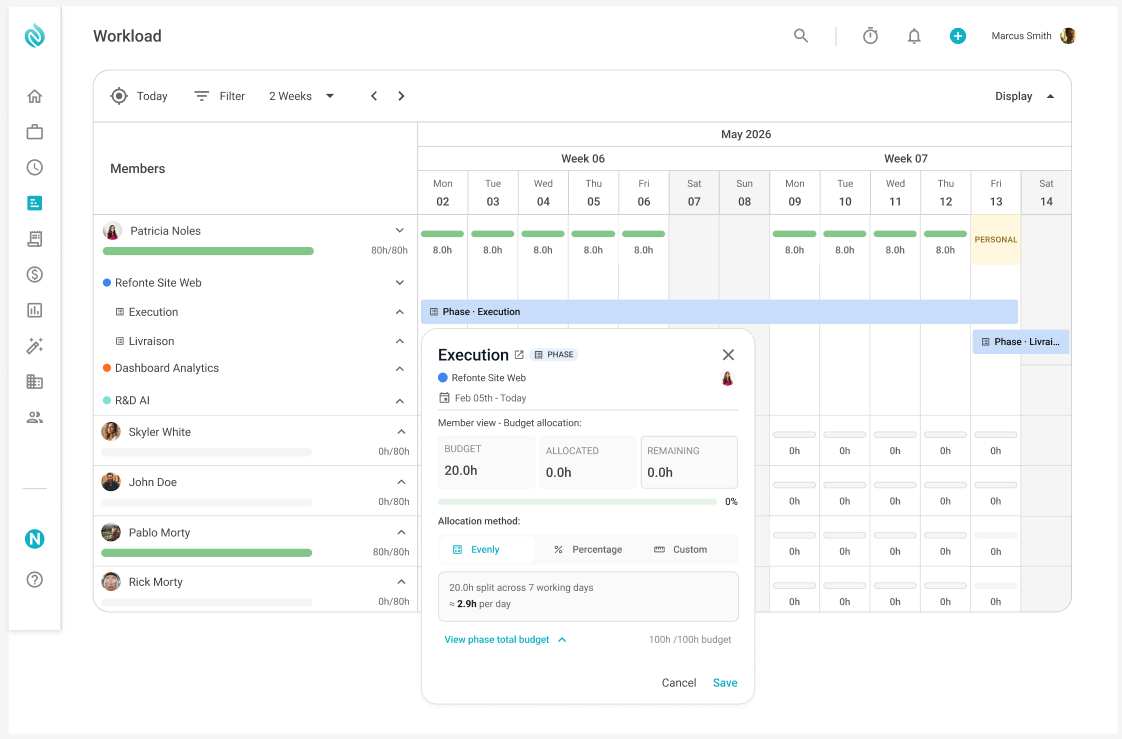
Updated Workload view with project phases and the phase allocation card.
Who can use Workload?
Access depends on each member’s role and project permissions:
Administrators and owners can view and manage the workload of all members and projects.
Project managers can view and manage members, phases, and tasks associated with their assigned projects.
Regular members can view only their own workload and the phases or tasks assigned to them.
Regular members can open their own phase allocation card, but it is read-only. They cannot change allocation methods, modify phase budgets, view the phase’s total budget, or see the hours assigned to other members.
Regular members may edit planned dates and estimated time only when their project permissions allow it.
Where can you find Workload?
Select Workload from the main menu on the left side of the screen.
Workload is available from the main navigation menu.
Understanding the Workload screen
The screen is divided into two main areas:
Members section
The left panel displays your team members and their current workload. Expand a member to view their projects, project phases, tasks, subtasks, and planned hours.
Unassigned tasks appear in a separate section at the bottom of the panel, where they can be assigned using drag and drop.
Calendar section
The calendar displays phases and tasks across the selected period. It lets you see when work is planned, how many hours are assigned, and whether a member has available capacity.
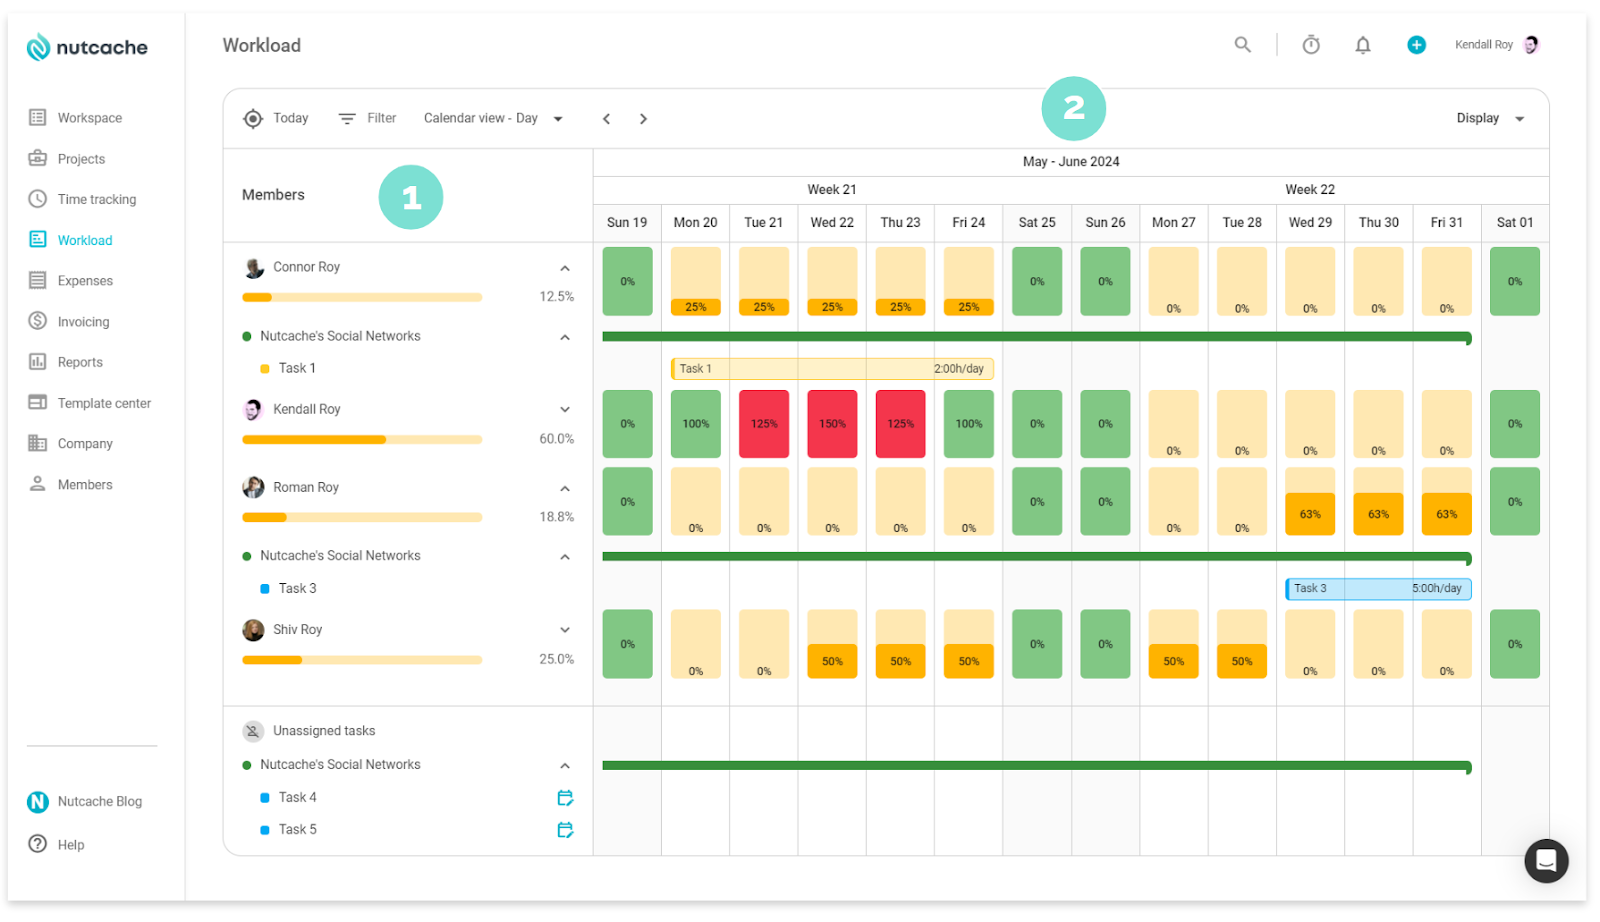
The existing article identifies the Members section (1) and calendar section (2).
Use the calendar controls to return to the current date, move forward or backward in time, change the displayed period, show workload in hours or percentages, show or hide weekends, and show or hide unassigned tasks.
Understanding workload indicators
Workload uses visual indicators to help you evaluate each member’s capacity:
Yellow: 0% to 70% of the member’s capacity is being used.
Green: 70% to 100% is being used.
Red: More than 100% is being used, meaning the member is overloaded.
Phases, tasks, and subtasks can also display budget warnings. When scheduled hours exceed the available budget or estimate, the bar receives a red border, a warning icon appears, and the number of hours over budget is displayed, such as +5h.
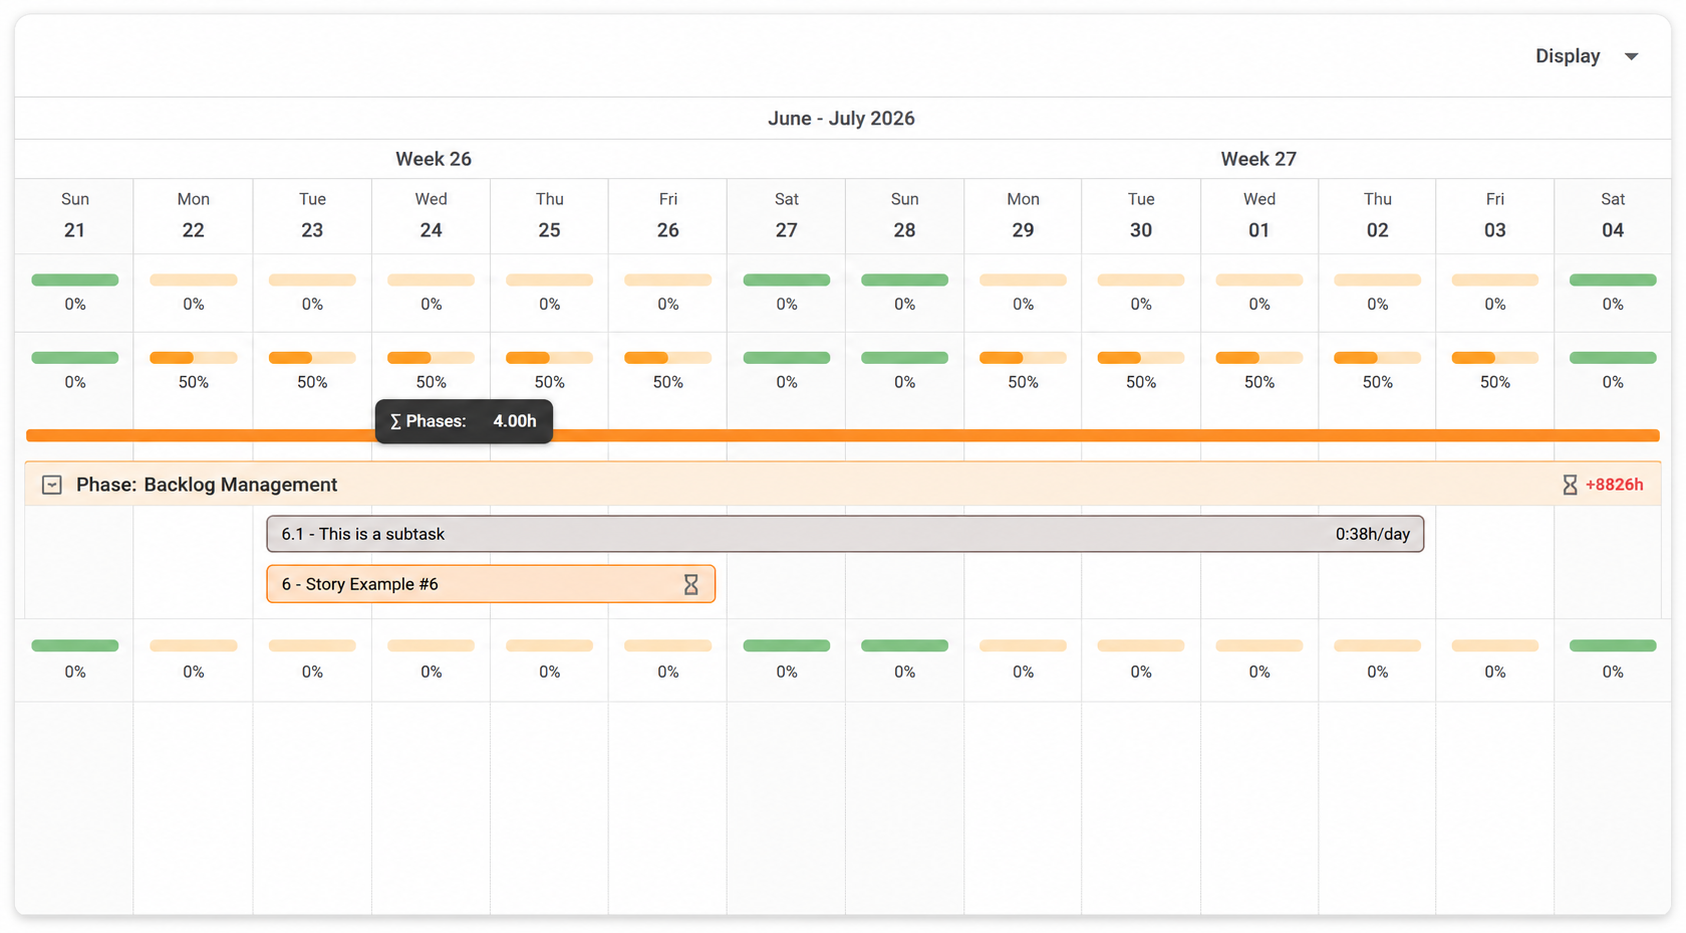
Example of a phase and task displayed with over-budget indicators.
Planning work with project phases
Project phases can appear directly in Workload, allowing you to plan resources before every task has been created. A phase can appear as either a budgeted phase or a marker phase.
Budgeted phases
A budgeted phase contains hours assigned to one or more members. These hours are distributed across the phase timeline using an allocation method.
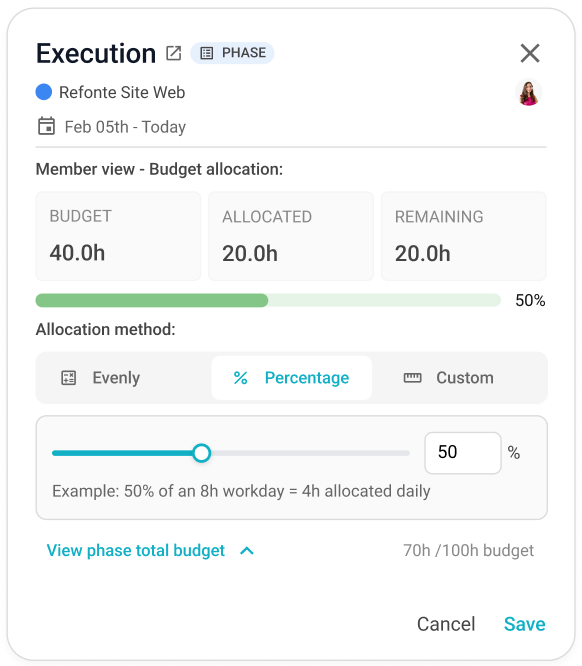
Clicking a budgeted phase bar opens a phase allocation card showing the selected member’s budgeted hours, allocated hours, remaining hours, allocation percentage, and allocation method.
Administrators and authorized project managers can edit these values. Regular members can only view their own information.
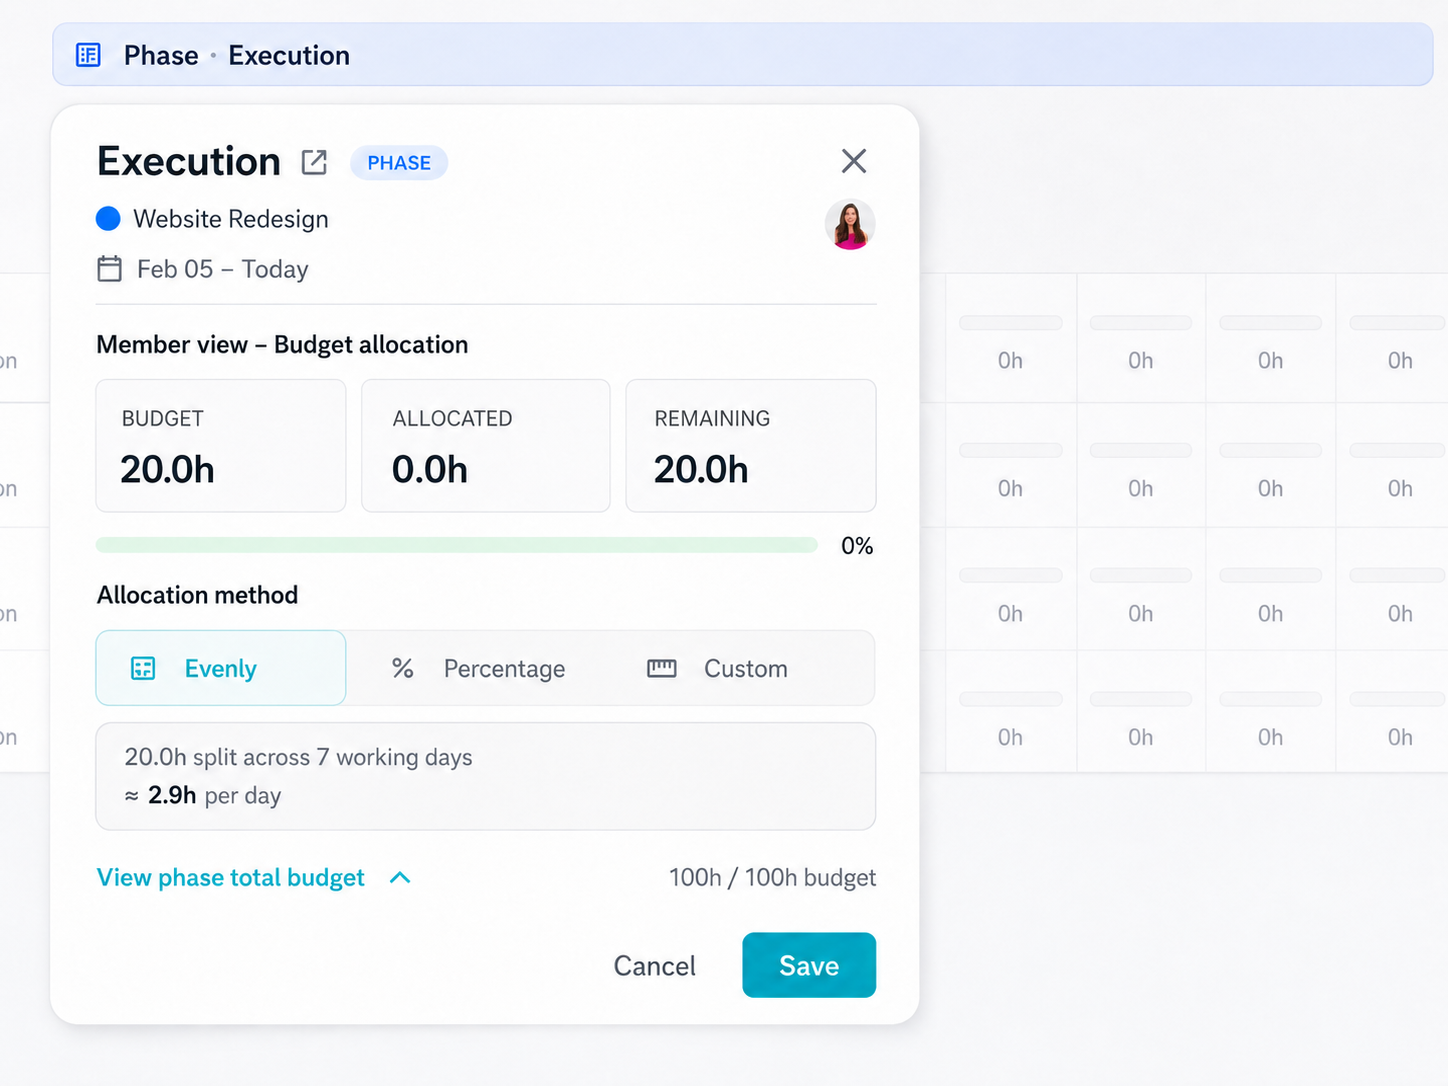
Phase allocation card with Budget, Allocated, Remaining, and the three allocation methods.
Marker phases
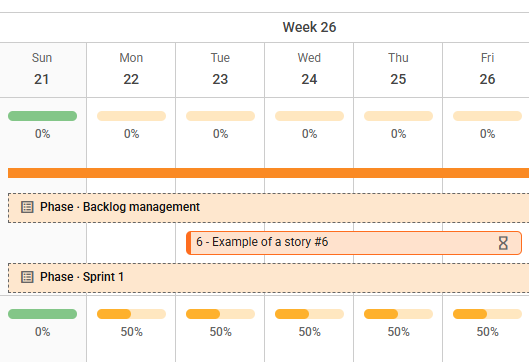
A marker phase appears on the calendar as a visual reference but does not add hours to a member’s schedule. Marker phases are useful for milestones, kickoff periods, review windows, delivery periods, or phases that have not yet been fully estimated.
Marker phases have a dashed border and cannot be opened. Depending on the phase configuration, administrators and project managers may see a tooltip explaining why the phase is displayed only as a marker.
A marker can later become a budgeted phase when a budget and member hours are added.
Setting a phase budget
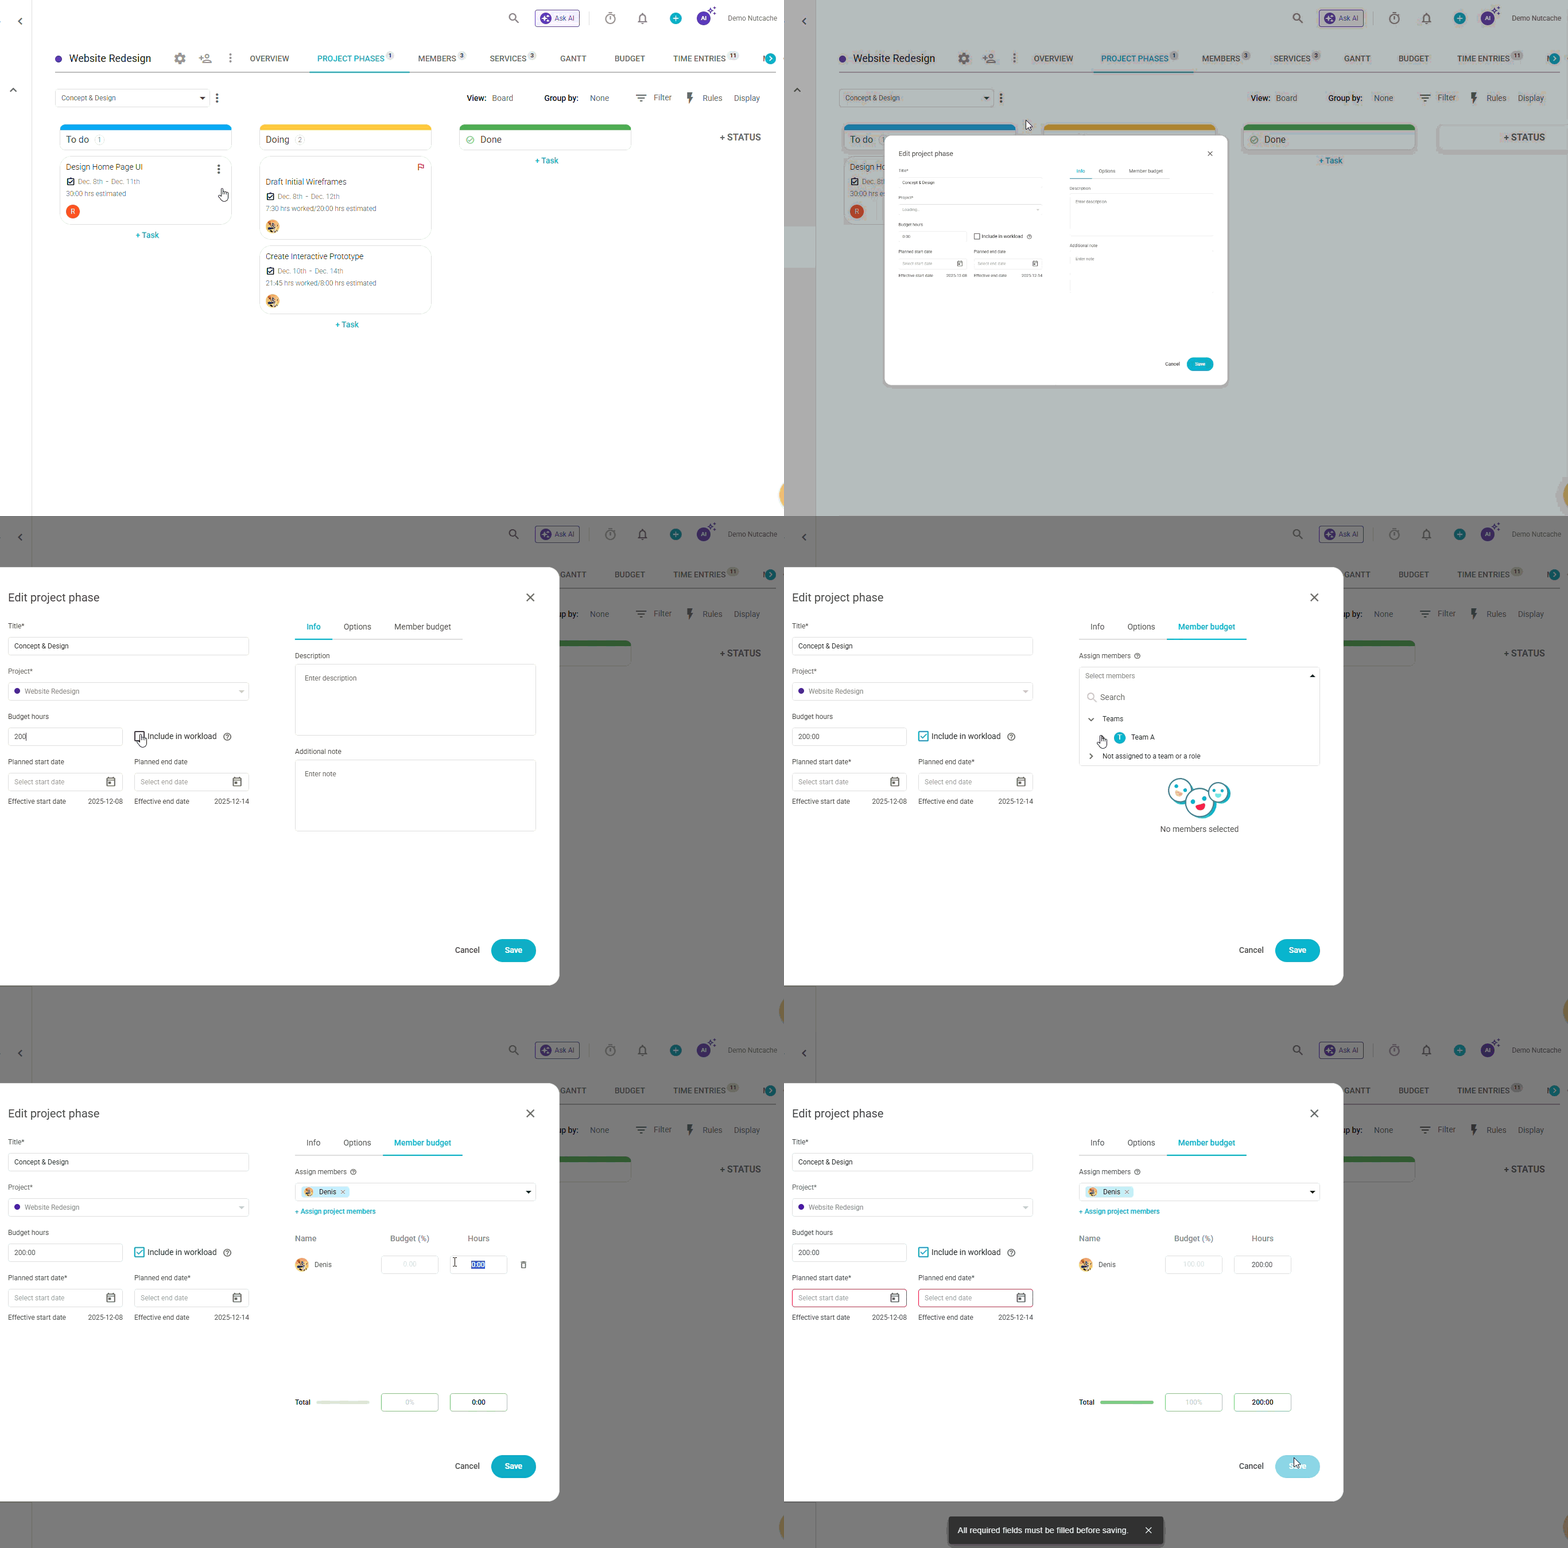
You can configure phase budgets from several locations.
From the project budget
Open the project.
Select Budget.
Open the Hours subtab.
Select Per project phase as the budget type.
Select Set project phase budget.
From an existing phase
Open the project’s Project phases tab.
Select a phase from the phase list.
Open the phase menu.
Select Edit.
Open the Member budget tab.
When creating a phase
Open the project’s Project phases tab.
Select + Project phase.
Open the Member budget tab.
Enter the phase budget and each member’s assigned hours.
Allocating phase hours
Each member’s phase allocation is managed independently. Changing one member’s method or hours does not redistribute or modify the hours of any other member.
Divide evenly
This is the default method. The member’s budgeted hours are divided equally across their available working days during the phase. Weekends, holidays, and the member’s time off are excluded from the calculation.
Example: A member has 30 budgeted hours over 10 working days. Workload schedules 3 hours per day.
This method always keeps the member’s total scheduled hours equal to their phase budget.
Divide evenly spreads the member’s budget across available working days.
Percentage
This method reserves a fixed percentage of the member’s daily capacity throughout the phase. For example, a member with an eight-hour workday allocated at 50% is scheduled for four hours per working day.
Because this calculation is based on daily capacity rather than the member’s phase budget, the resulting total may be lower or higher than the budget. When the total exceeds the member’s budget, Workload displays an over-budget warning.
Custom
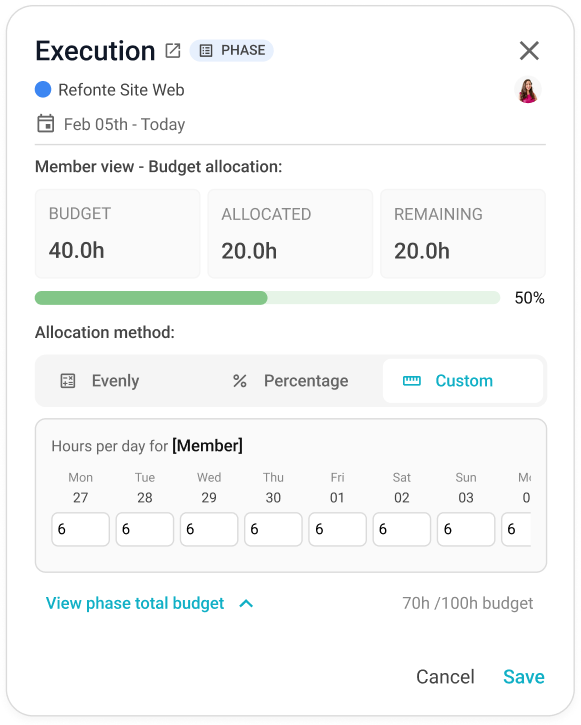
This method lets you enter a specific number of hours for each working day. Use it when the member’s involvement varies from one day to another or when precise daily planning is required.
Custom allocations may also exceed the member’s phase budget. When this happens, the hours are preserved, but Workload displays a warning.
Members with a zero-hour budget
A member can be assigned to a phase with zero budgeted hours. With Divide evenly, the member remains at zero hours each day. With Percentage or Custom, hours can still be scheduled, but those hours are displayed as over budget because the member was not originally allocated any budgeted time.
Managing task allocations
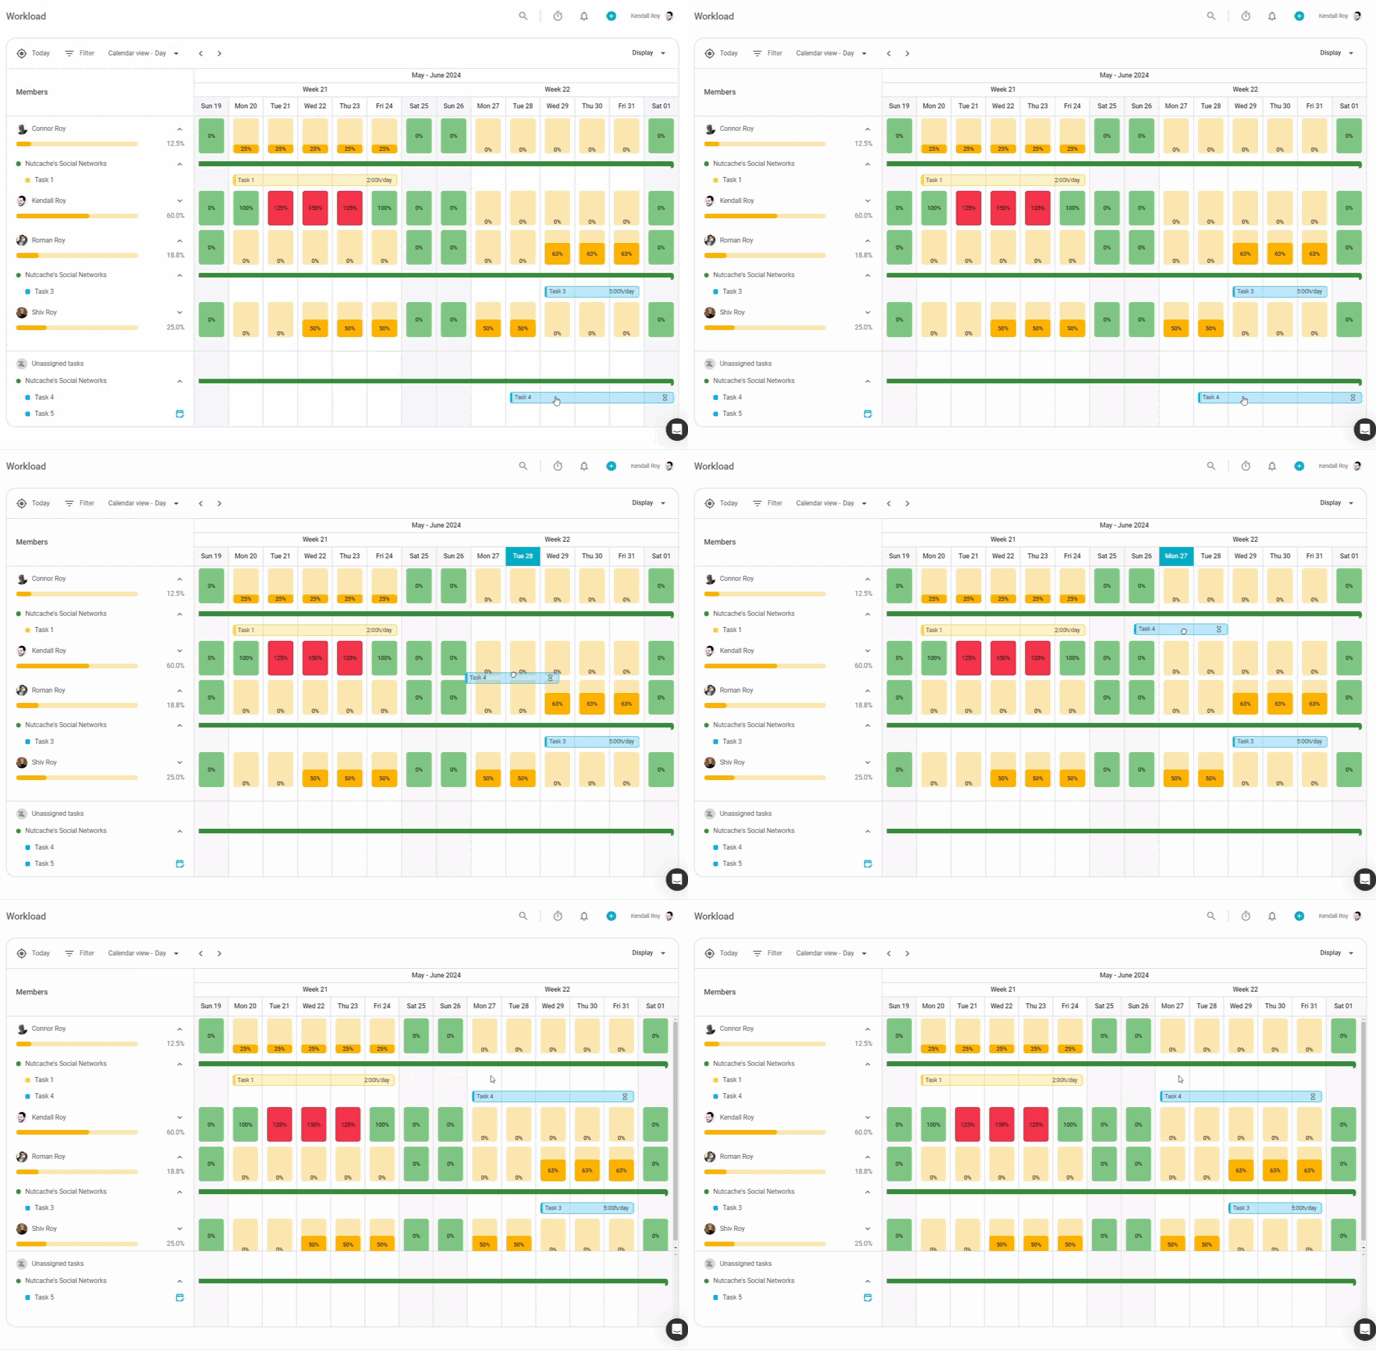
Assigning an unassigned task
Expand the Unassigned tasks section.
Locate the task.
Drag it onto a member’s row.
Drop it on the desired start date.
The task is assigned to that member and placed on the calendar.
Viewing a member’s projects and tasks
Select the arrow beside a member’s name to expand their workload. Their projects, phases, tasks, and subtasks appear in the Members panel and on the timeline.
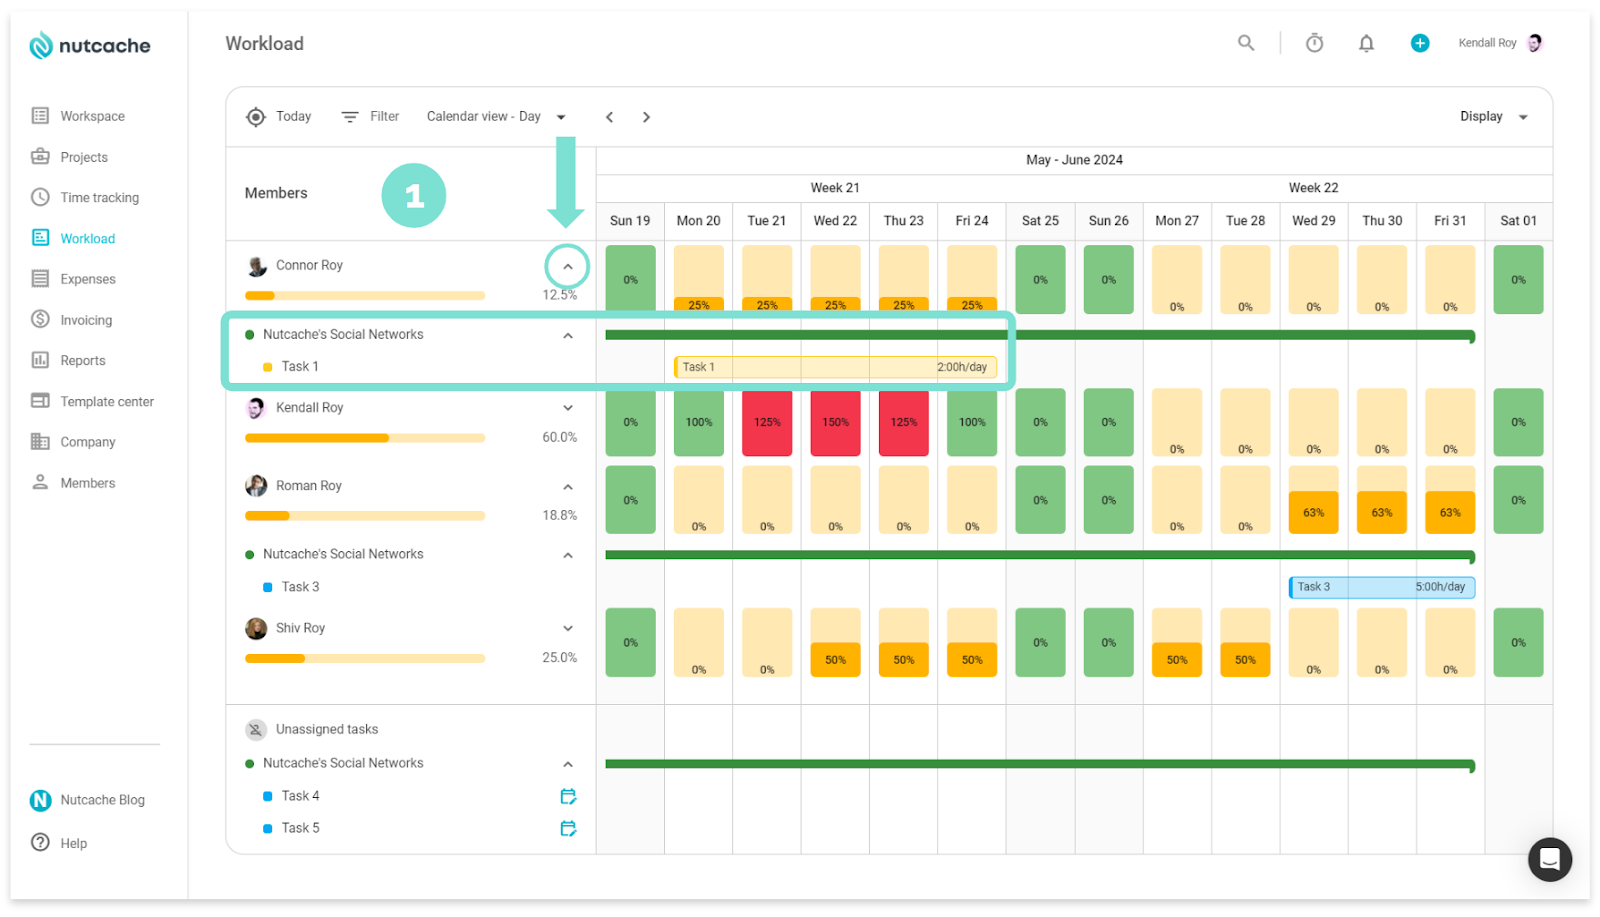
Expanded member view from the current help article.
Reassigning a task
Drag the task from one member’s row to another member’s row. The assignment is updated automatically.
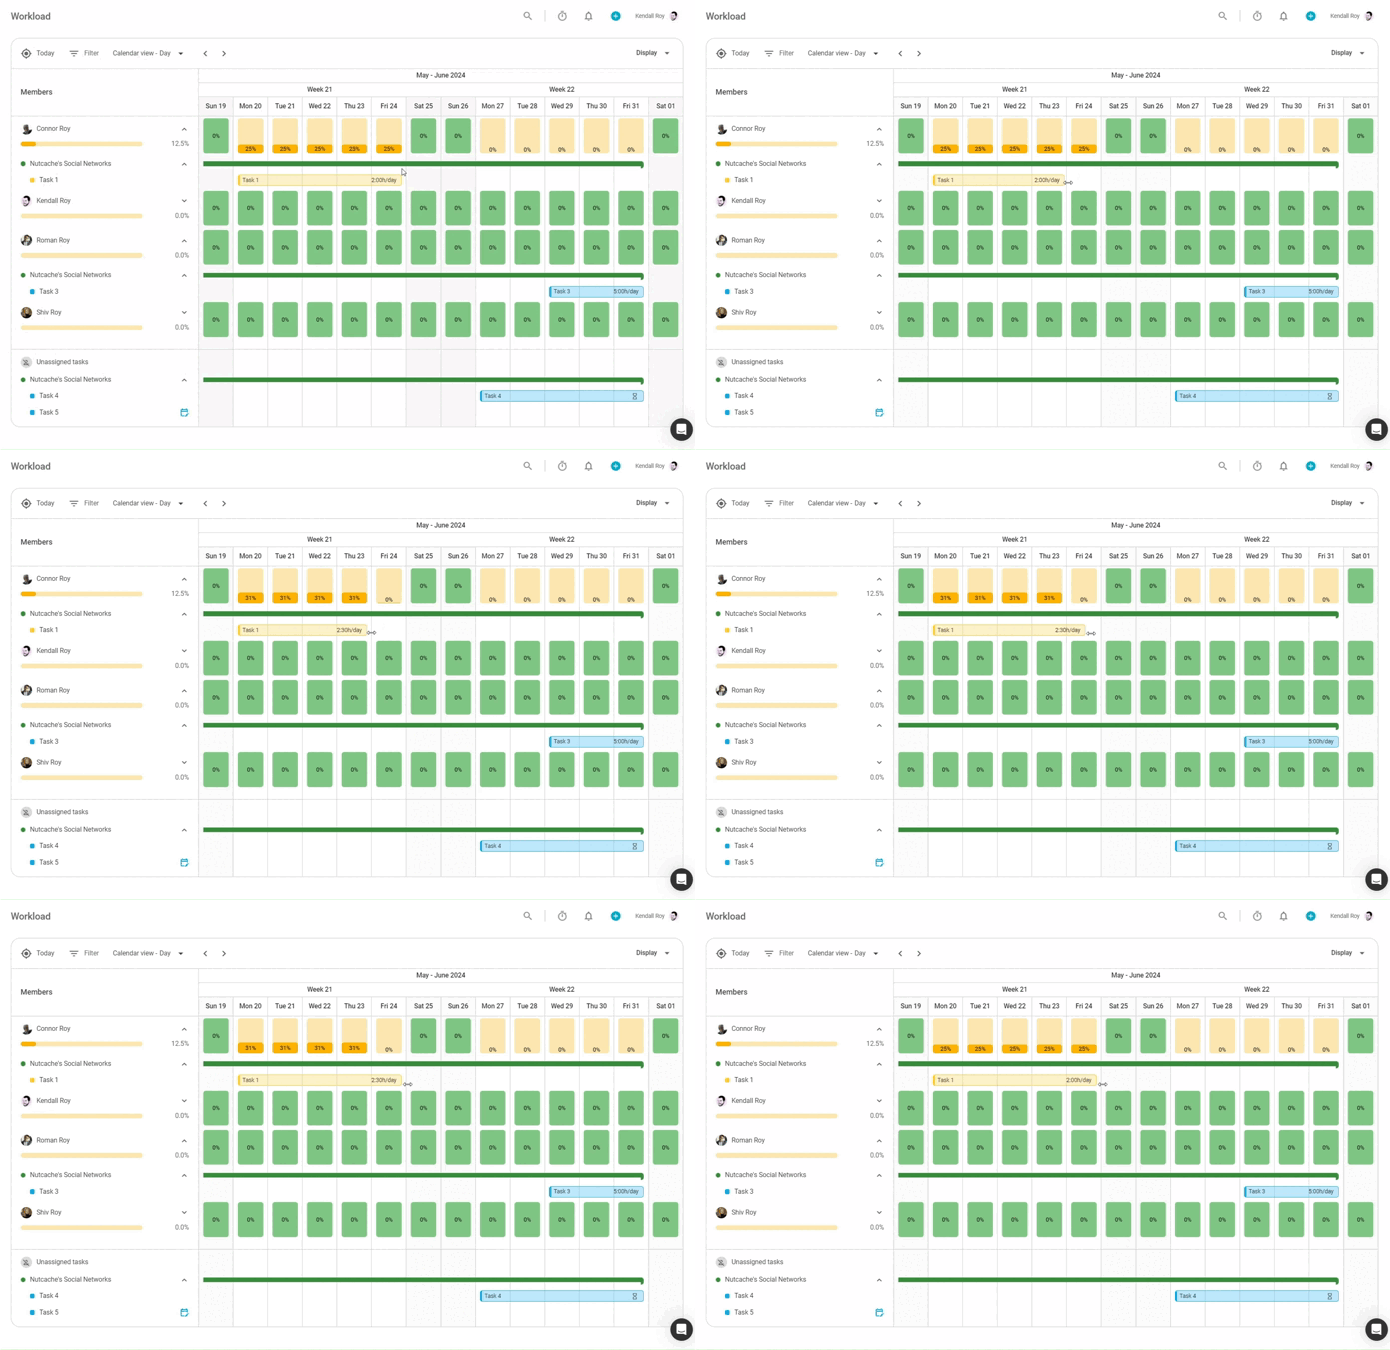
Changing planned dates
Drag a task bar to move it to a different period. To extend or shorten the task, drag the beginning or end of its bar. The task’s planned dates are updated accordingly.
Returning a task to the unassigned section
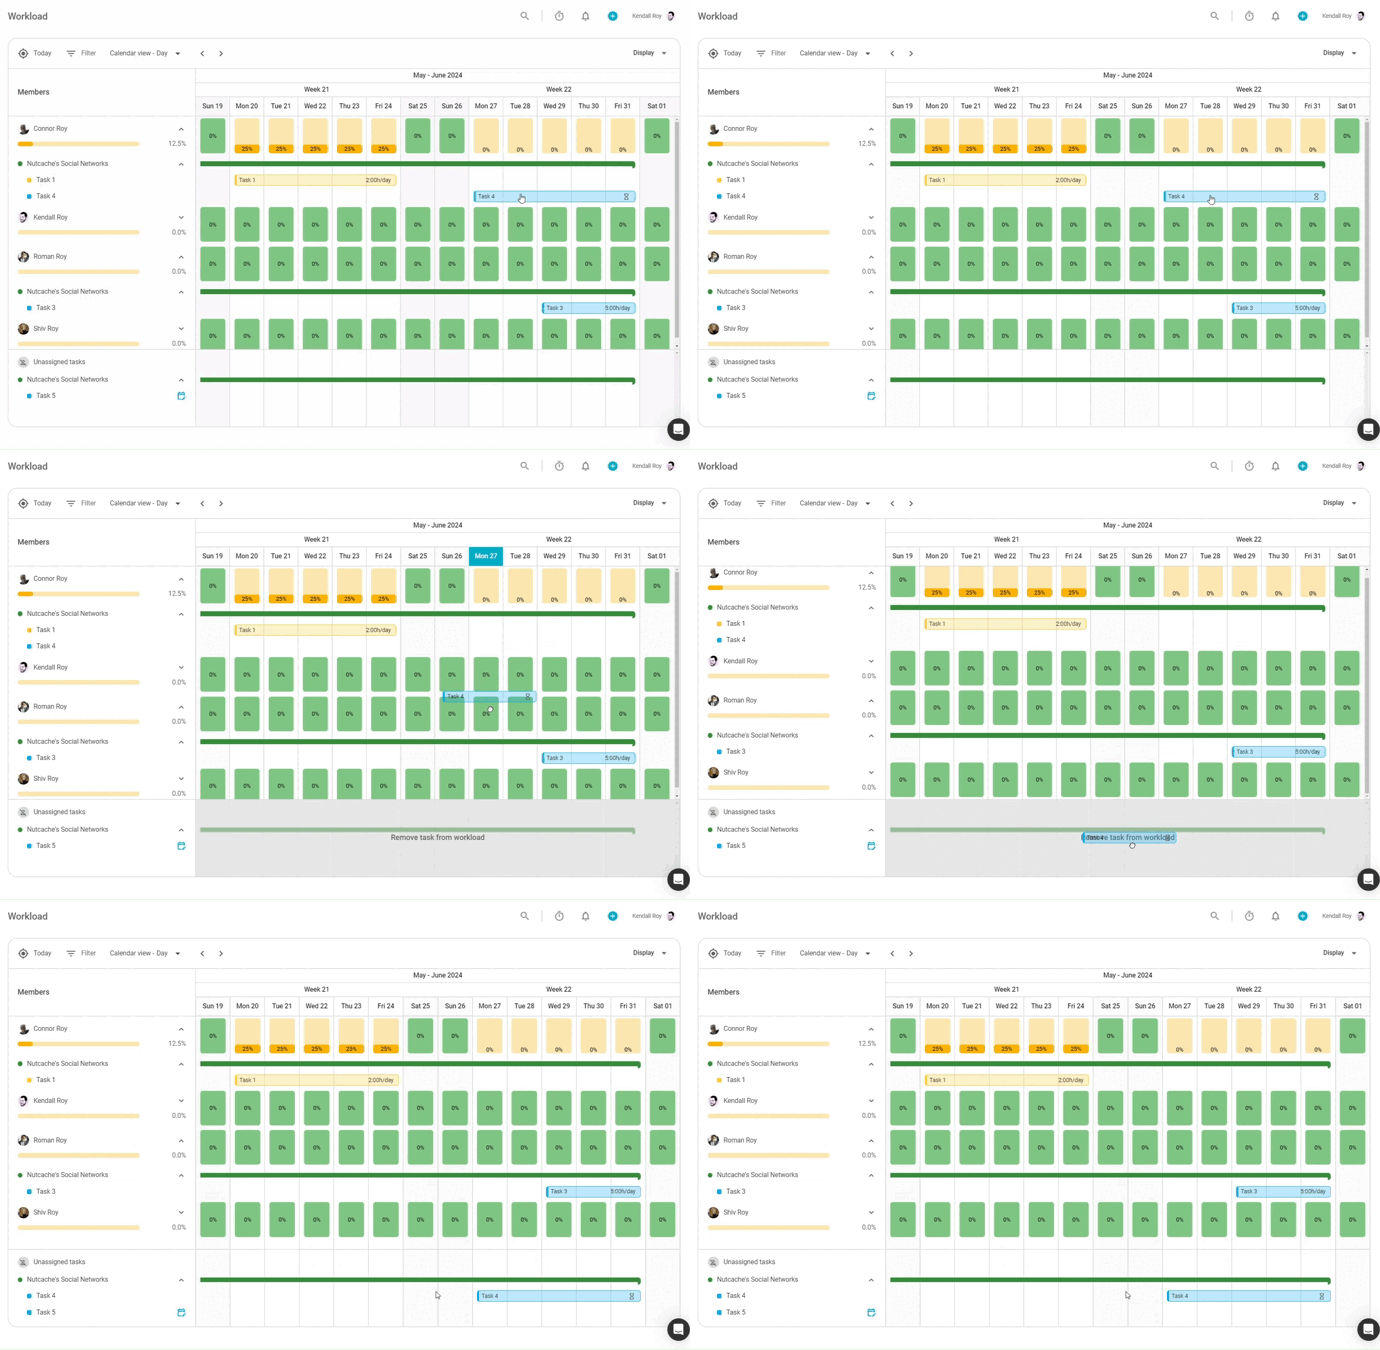
Drag the task back into Unassigned tasks.
IMPORTANT: Doing this removes every member currently assigned to the task, not only the member whose row you are viewing.
Opening a task allocation card
Click a task bar to view its workload information, including the project and task names, planned dates, estimated time, time already used, allocated hours, and allocation method.
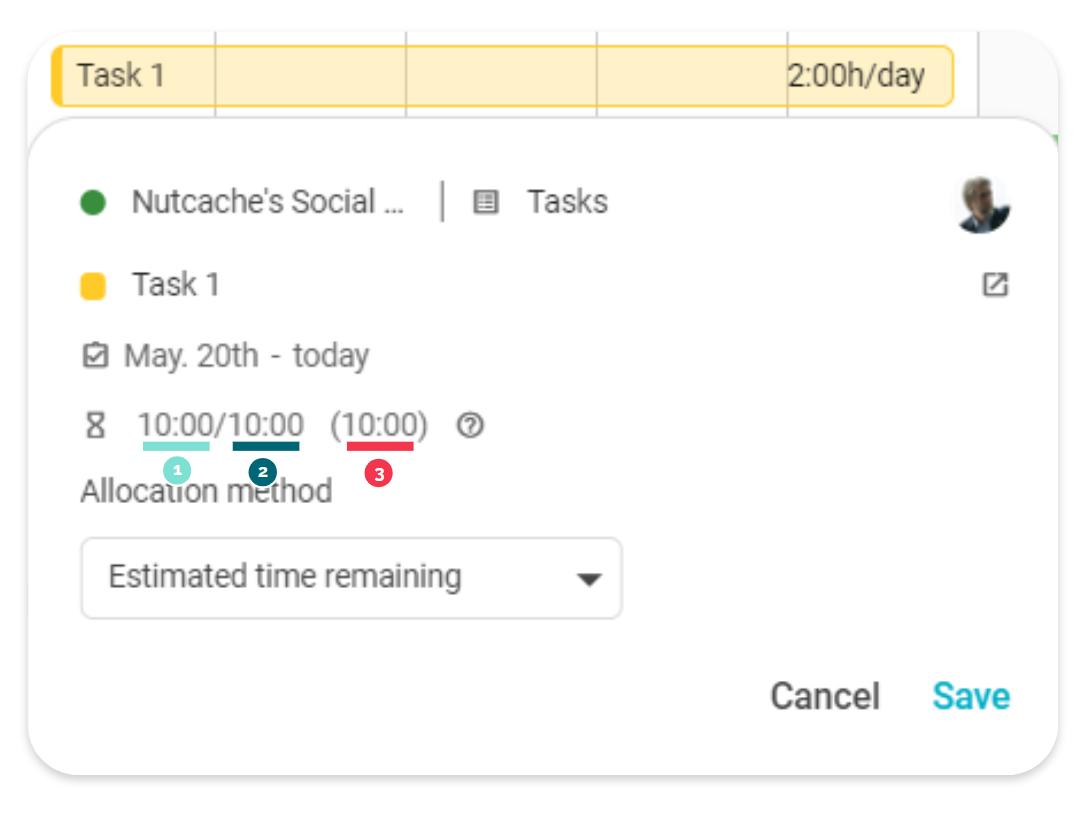
Task allocation card using the Estimated time remaining method.
Task allocation methods
Estimated time remaining
The task’s remaining estimated time is divided across its planned duration and assigned members.
Estimated time remaining allocation method.
Percentage
A fixed percentage of the member’s daily working capacity is assigned to the task. For example, a 20% allocation means that the member spends 20% of each working day on the task. It does not mean the member completes 20% of the task’s total estimated work each day.
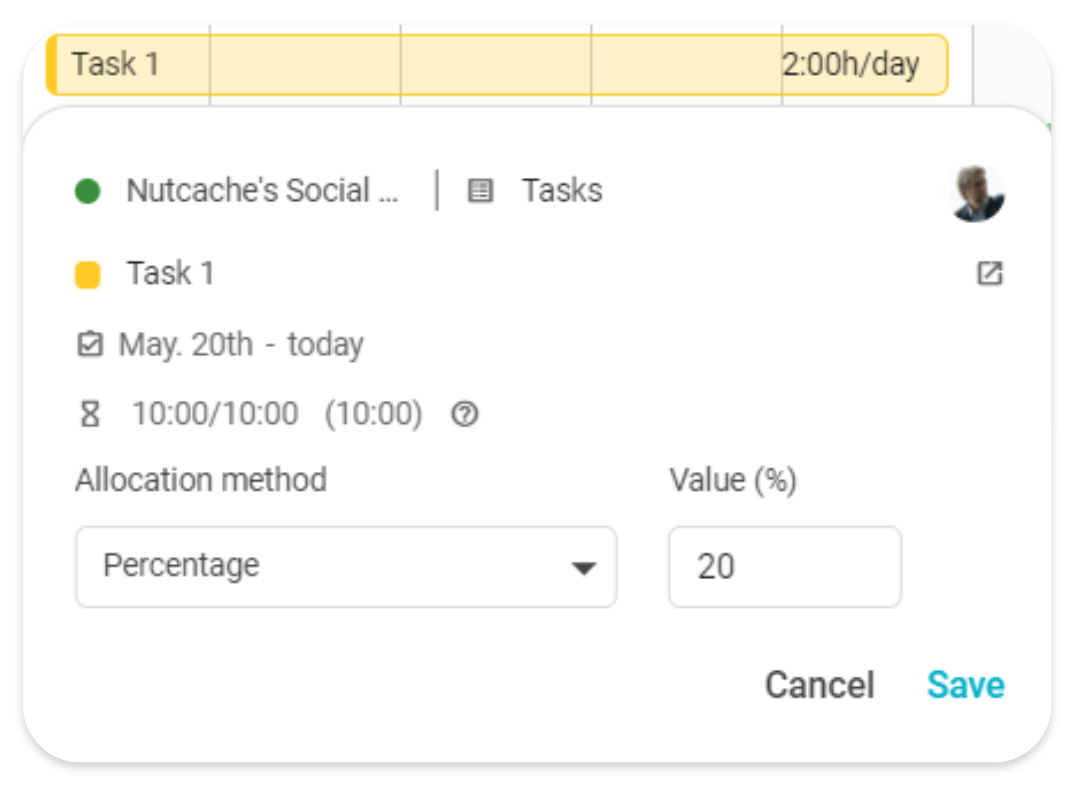
Percentage allocation for a task.
Custom
Enter the exact number of hours the member should spend on the task for each day.
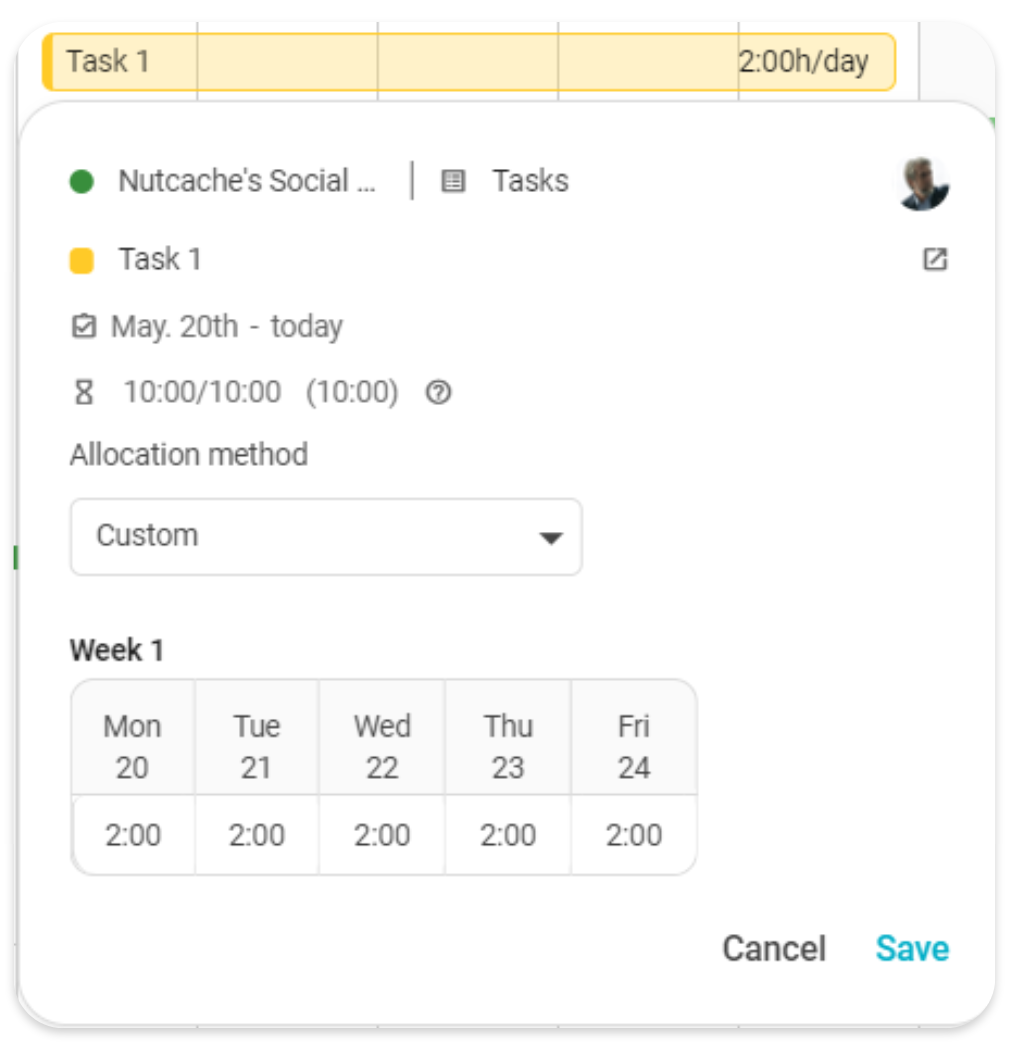
Custom day-by-day task allocation.
How phase and task hours work together
Phases provide a high-level plan, while tasks and subtasks provide a more detailed breakdown of the work.
When a member has hours scheduled at both levels on the same day, Workload does not automatically add the phase hours and task hours together. Doing so could count the same planned work twice.
Instead, Nutcache compares the member’s phase hours for the day with the combined hours of all tasks and subtasks under that phase. The higher value is used as that phase’s contribution to the member’s daily total.
Example 1: The phase allocation is higher
Phase allocation: 5h
Combined task hours: 3h
Contribution to the daily total: 5h
Example 2: Task hours are higher
Phase allocation: 4h
Combined task hours: 6h
Contribution to the daily total: 6h
Example 3: The values are equal
Phase allocation: 4h
Combined task hours: 4h
Contribution to the daily total: 4h
When both values are equal, the hours are counted once and the phase is used as the displayed source.
Understanding daily planned hours
A member’s daily total is calculated in three steps:
Nutcache compares the phase hours with the combined task and subtask hours for each phase.
It keeps the higher value for each phase.
It adds the contributions from all phases assigned to the member.
Example: Phase A contributes 5h, Phase B contributes 4h, and Phase C contributes 3h. The member’s daily total is 12h.
Viewing the daily-hours breakdown
Hover over a member’s daily total to see where the hours come from. The tooltip displays one line for each phase contributing hours that day.
When the phase allocation is higher, the phase name is displayed.
When the phase and task totals are equal, the phase name is displayed.
When one task produces the higher value, the task name is displayed.
When several tasks produce the higher value, the phase name and contributing tasks are displayed.
Phases contributing zero hours are excluded from the tooltip. No tooltip appears when the daily total is zero. The daily breakdown is also unavailable in the Quarter and Year views.
Working with subtasks
Subtasks are treated as tasks in Workload. Their hours contribute to the task total used when comparing task hours with the phase allocation.
To avoid an unclear or inflated workload, define estimated time either on the parent task or individually on its subtasks. Avoid estimating both the parent task and all its subtasks unless both values intentionally represent separate work.
Vacations, leave, holidays, and non-working days
Workload takes each member’s working calendar into account, including weekends, vacations, approved leave, holidays, and other configured non-working periods.
Phase hours are not distributed onto these days. On a non-working day, the daily total is not calculated. The cell remains empty or displays the applicable absence label, and no workload breakdown tooltip appears.
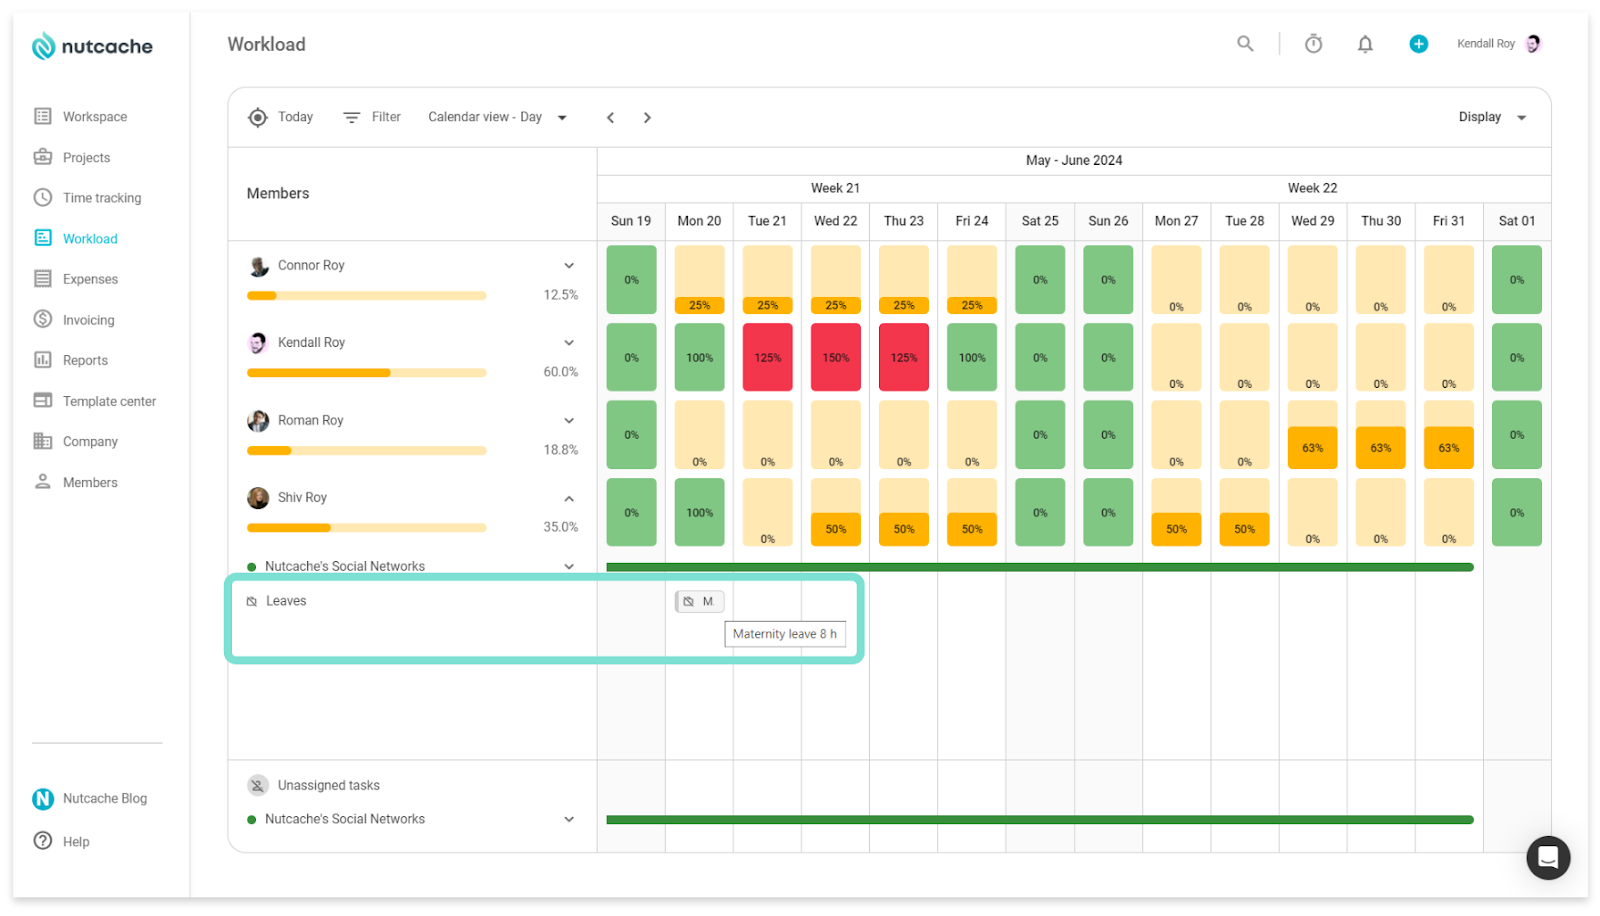
Example of a leave period displayed in Workload.
Filtering and customizing the calendar
Use filters and display options to focus on the information you need.
Filter by member or team.
Filter by project.
Display workload in hours or percentages.
Show or hide weekends.
Show or hide unassigned tasks.
Move between calendar periods.
Return directly to the current date.
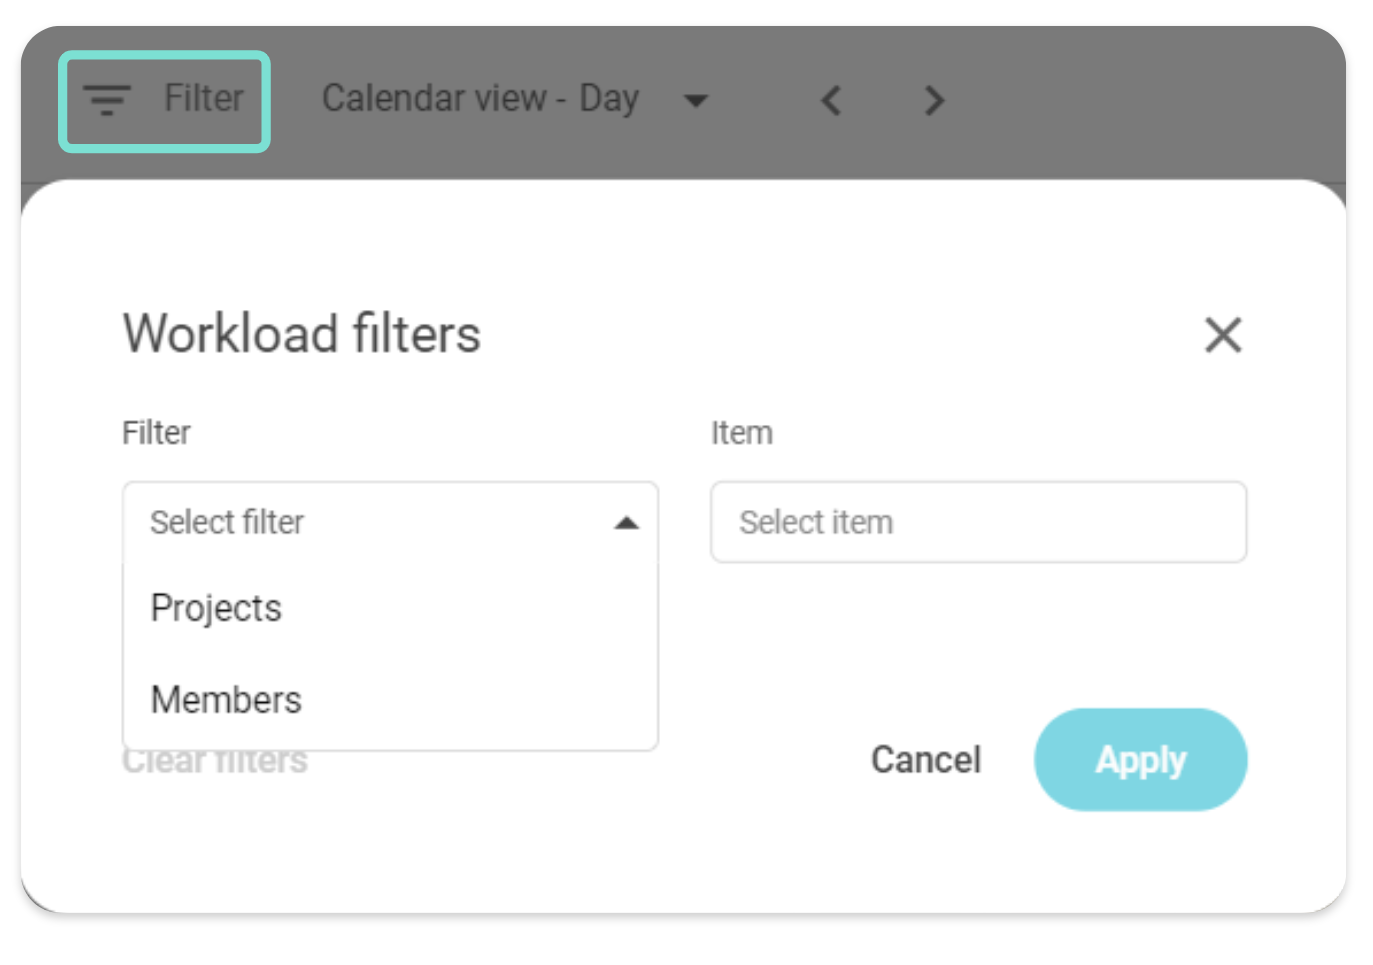
Workload filters from the current help article.
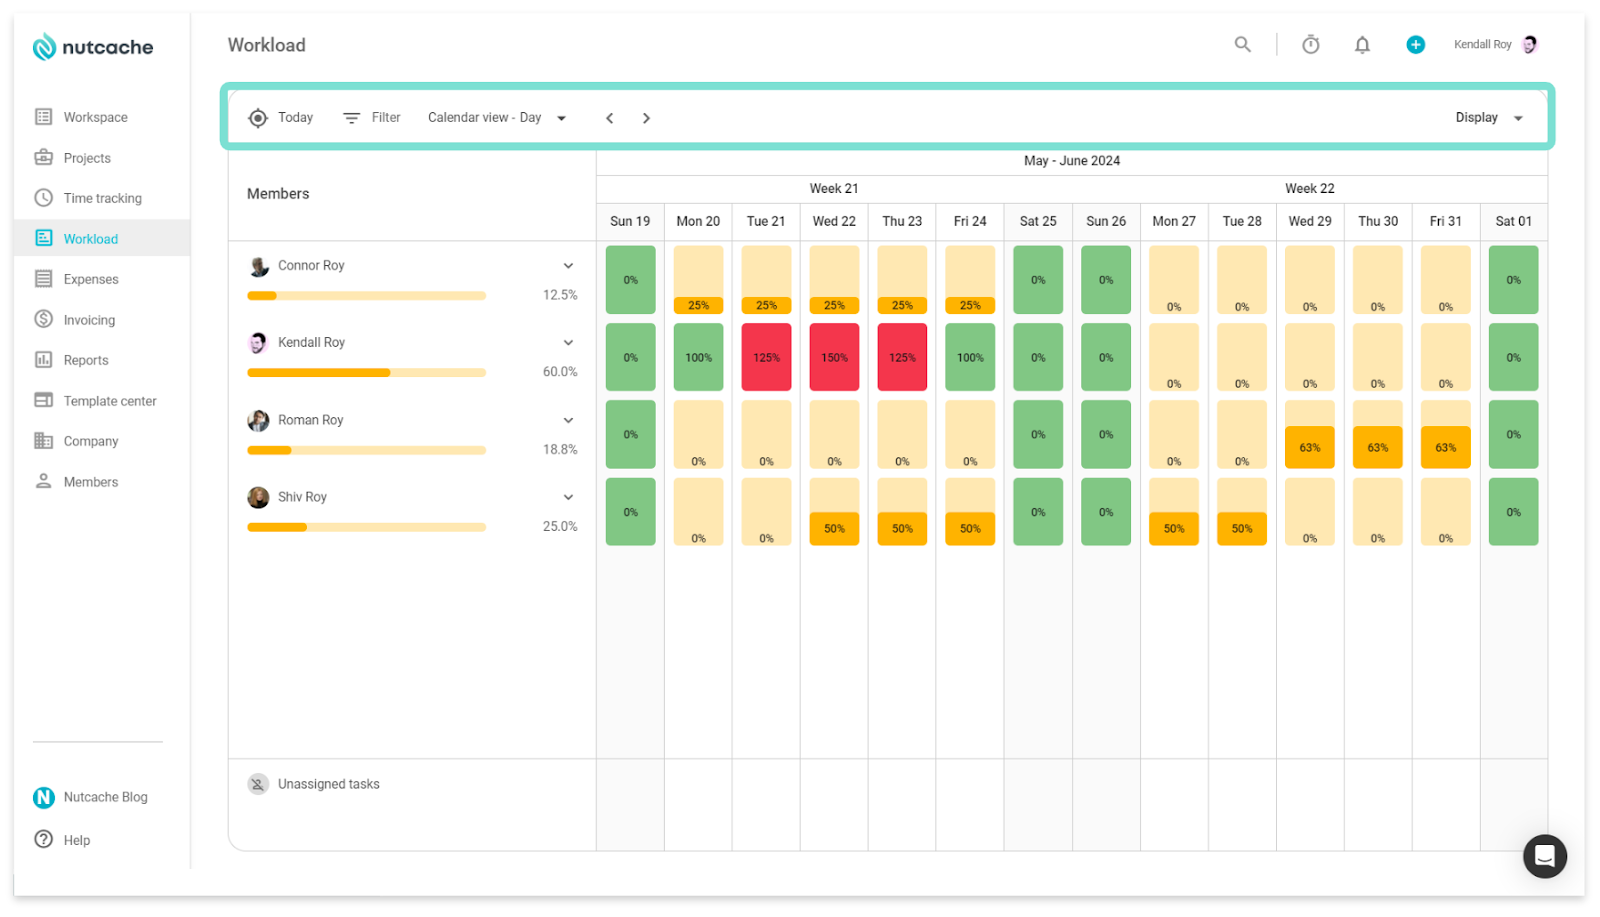
Calendar controls and display options from the current help article.
Recommended planning workflow
Add the project phases and their planned dates.
Use marker phases for stages that are not yet budgeted.
Set the phase budget and assign budgeted hours to each member.
Select the most appropriate allocation method for each member.
Add and schedule tasks as the work becomes more detailed.
Review daily totals and hover over them to understand their sources.
Monitor red indicators for capacity, phase-budget, and task-estimate issues.
Adjust the schedule before workload or budget problems affect the project.
Need a hand?
Our team can help you find the answer.
Contact us